Last night I had a most entertaining solo game using my 15mm Warrior figures.I used my very simple and fast solo rules based on the number of bases in a conflict times an average dice to inflict a "hit" on a unit,denoted by an orange mini "pom-pom"-once three hits are recorded a base is removed-very simple but effective)I think!)
Top photo shows everything I needed for the game-the "hit/miss" dice are for the artillery!
Bottom photo shows the fine defensive position I gave the Confederates,with reinforcements on their left.
Two shots of the Union attack-I used alternate moves and threw two dice to determine how many brigades/batteries I could move per move.
My plan was to attack frontally in the centre,then move around the "Rebs" left flank-simple,the objective was to capture the defensive position.
My brigades are attacking along the whole of the line,but the defensive position was to prove a "hard nut to crack!"
A view of the playing area from the Confederate side-all action-note the ever-increasing orange "pom-poms" on both sides!
A rash decision saw my leading brigade charge the wall,only to be flung back,after taking massive casualties-oh dear!
Despite the set-back at the wall,my out-flanking brigades are pushing onto the "Rebs" flank and guns-this flank also proved to be a "hard nut to crack!!"
A general shot of the playing area-although I had 1/3rd more troops than the Confederates,I wasn't making as much headway as I thought I would,at this stage in the game.
Then................out-numbered and out-gunned,the Confederate left collapsed!!!-hurrah!
Two final shots,showing the desperate situation that the Confederates are in,hemmed in,and no chance of winning!
I really enjoyed this game,and will play another very soon,maybe incorporating cavalry.
Last night we had the most interesting and near run thing,pitting a Dervish army against the might of the British Empire,in the Sudan.
This is the terrain map and scenario-Brian was "thrust" into commanding the Fort alone as Dave couldn't make it,but he proved he was more than capable of the task.Graham commanded the right of the Dervish army,Paul the left,and me the centre-what a game it turned into!!
The look of intrepidation was replaced by "smug" satisfaction as soon as Brian realised the effect his massed rifle/gatling/artillery fire had on the Hadendowah and Ansar troops charging at the Fort!!...........................
With screams and yells,the first attack goes in-only to be stalled by "Stalwart Irving", defender of the Empire!!
Top photo shows the second attack developing,bottom photo shows,despite Brian's shouts of "you dusky rascals won't get into my Fort!", THEY DID!!!!-hurrah.
This shows the "returning" 21st Lancers cutting a swathe through Graham's out-flanking Ansars-unfortunately Brian elected to turn the Lancers around and continue the fight-resulting in getting them wiped out!!!(the Lancers had been out scouting and could return,on any move from the bottom left hand corner of the board!!)
By now the Fort was all but surrounded by "dusky rascals" but Brian was doing well to keep them out by "dint" of bayonet,and bloody good dice throwing!!
This shot shows Graham's attack on the rear of the Fort,whilst he is still putting Brian under pressure from the flank-Paul has now defeated the troops in the smaller compound,and things are not looking good for the British.
This shows the larger compound,and the mass melee that followed Graham's assault on it-what he thinks he is going to do with his cavalry,I don't know!!
Brian has,some how,managed to win the mass melee,and the larger compound is secure again!!!
But the smaller compound has been taken by Paul.......................
This shows the sorry state of the smaller compound! With Brian still maintaining his grip on the rest of the Fort,and Graham's troops well and truly beaten(not to mention mine!) a draw was the best result we could hope for!-A great game,we all had to go and have a lie down in a darkened room to recover!!
We won't be playing next Sunday,as we are going on a "road trip" to York-full report will follow.
Today(and tomorrow!) is the anniversary of Isandlwana and Rorke's Drift-I hope you all celebrated in style!!
I have decided to get into the spirit and preview Sunday's game(27th)
Top photo is explanation,bottom photo is the table as the "lads" will see it on arrival-well,it's different(and hopefully exciting!)
The British position-fort Invincible(?)-Brian knows a poem about the desert!!
The Dervish left and centre.
The Dervish right and centre.
This could be a typical colonial game-fast and furious-roll on Sunday!
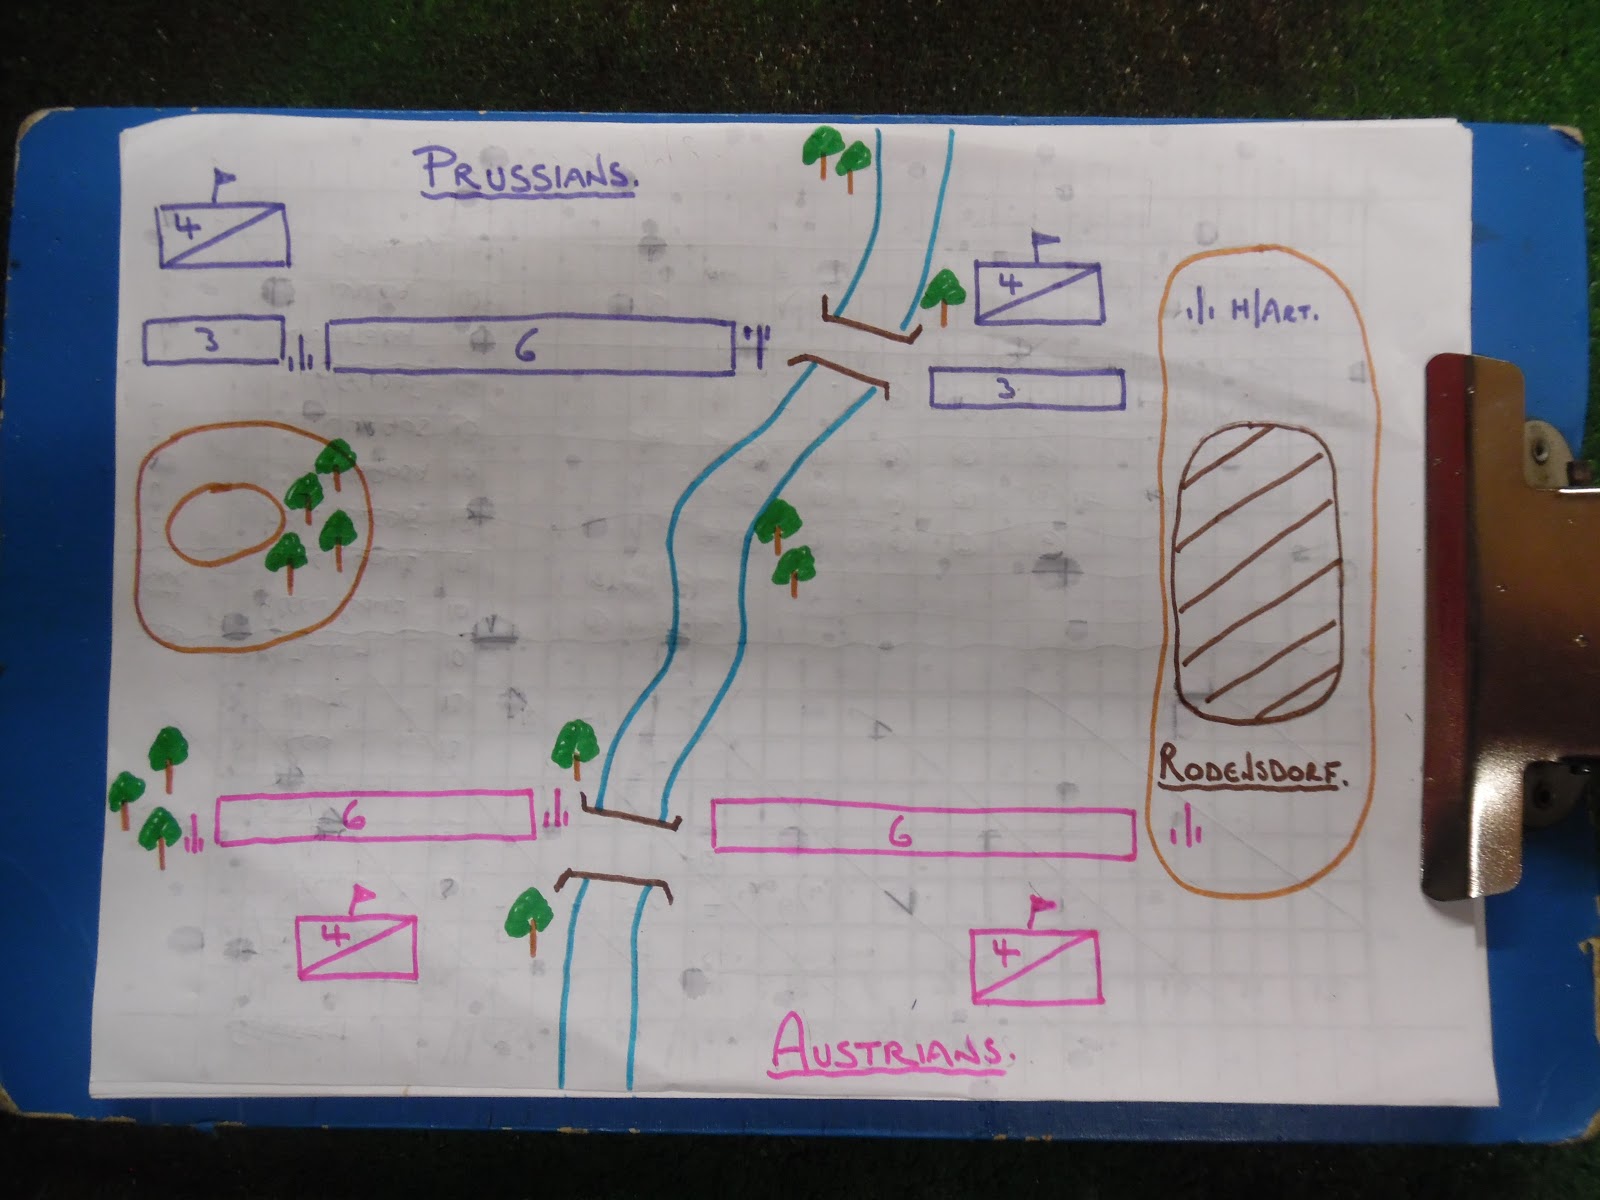
Last night we had another 100% turnout for what turned into an epic game/battle,using my Prussians against Paul's Austrians.
This is the terrain map-I didn't have a scenario,as such,only that the hills were half movement,the trees were decorative,and the river could only be crossed via the bridges-the objective for both sides was to capture the enemy's bridge!!
This is the table before any movement-Paul and Graham were the Austrians,and Dave and Brian were the Prussians.
Look at this for a study in organisation,co-ordination and planning!-you would almost swear that they knew what they were doing!!!!
The Prussians extra movement "bonus" caused a bit of an alarm to the Austrians,as a fire-fight ensued in the centre and Dave moved his horse battery,from his left flank into the centre!-marvellous stuff!(and look,the bases fit into the bridges!)
Paul's advance,into a storm of shit,shot and shell,was magnificent to see-wargaming at its best,I think!-but would it prove a bit too "avant garde"-we will see.
Dave has met Paul's advance,and is moving his cuirassiers up in support of his infantry.
In the centre,a lapse of concentration by Brian, has allowed Graham to attack his forward regiment in the flank,destroying it completely!! However his other regiments are giving the Austrians hell!!
By way of revenge,Brian has unleashed his heavy cavalry and is driving Graham's back.
The fire-fight is on-going,but the Prussians are winning it-this looks bad for the Austrian bridge!!!
All of a sudden,the ground in front of Brian's infantry is void of Austrian troops,and his reserve brigade is starting to advance-this looks like the end for the Austrians,however Paul is still battling away,and holding his own(I know,I know,they can't touch you for it!!)
Paul's flank is now suffering to the point that he is being enfiladed with artillery,and his cavalry and infantry are being beaten-time to capitulate???
YES!! and the Prussians are declared the winners!
This was a great and epic game,played in the right spirit-well done lads.
Roll on next Sunday,no clue as to what we will be playing yet.
I blame Dave for this latest project!!-on Sunday he brought up his "Custom-made" bridges,which were 80mm wide.I have had three bridges for about 100 years,and have always found them far too narrow for my bases,so decided to do something about them..................
Top photo shows one of my bridges,in a beautiful scenic setting,just ready for me to march an infantry regiment across it-bottom photo shows the regiment balancing and teetering on the too narrow balustrades!!-big problem,but in my world there are no such things as problems-only solutions!!
So what could I do??
Using only these tools,and a bit of ingenuity, I would widen the bridge(made of resin) to fit my bases.
Having first drawn a line up the middle of the bridge,I got to work with my trusty hacksaw,as shown in top photo-bottom photo shows the two halves,after about ten minutes of sawing.
What these photo's don't show is the range of safety equipment I was wearing,ie. hard hat,goggles,gauntlets and steel-capped safety boots!!!!!!!(liar)
After measuring a piece of cardboard(80mm wide,naturally!) I placed it onto the bridge,ready for sticking with UHU glue(other makes of glue are available!!)
Stuck and ready to be tested................................
Now that looks better!!
I applied the same method to the other two bridges,gave them a "lick" of paint,and hey presto,wide bridges!!
All three ready to go-guess what will feature in Sunday's game???
Any comments?