Tuesday, 16 September 2025

Border Reiver Show 2025

The Battle of the Metaurus River 207 BC

Hannibal was awaiting re-enforcements to bolster his army currently in southern Italy. 

He was faced by the legions of Gaius Claudius Nero. 

His brother Hasdrubal had assembled an army and followed in Hannibal's footsteps

 and marched across the Alpine passes heading southwards alone the eastern coastline.

Consul Marcus Livius, accompanied by Praetor Lucius Porcius Licinus

was attempting to prevent Hasdrubal joining with his brother.

Nero had deceived the master of deception, Hannibal and force marched 7000 men north.

They crept into the camp of Livius prior to the day of battle.

Morning trumpets heralded the awakening of the legions. 

Two blasts loudly announced the presence of both generals in the field! How so ?

Would the gods reward the Roman General's intrepid ruse? 

All will be revealed.


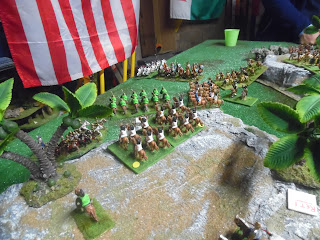
Our game display

A wonderful replica of a gladius sword, originally of Iberian origin !

Nero's Legion in the background facing off the

 Gallic left of Hasdrubal's army on top of a rugged ridge. 

The River Metaurus on the left bounded this part of the battlefield


The center of the Carthaginian line with 
elephants and light infantry in the front line.
Gallic warriors support in the second line
 with dependable Spaniards in the third line.

Opposite the Carthaginian center were the legionaries of Livius

Hasdrubal's right was composed of African veterans and Iberian warriors.

The open flank was guarded by Numidian light cavalry who
 were greatly outnumbered by their opposing Roman cavalry.


Our game had just under 2000 figures. 


The battle commenced with both lines eager to engage.

All except the gallic left flank of Hasdrubal ! Tired, drunk of just disinterested ?
They held their position atop a ridge which was perfectly secured
 to its front by ravines and broken ground. Why engage lower down the slopes ?


Wiley Nero wasn't going to bash his head against such a strong position though.

Screening the ravine, he again forced marched his men on a 
route that would end up as a decisive war winning move. 

Behind the confusion of the engaged battlelines, legions
 against the mighty Carthaginian war elephants, 
fearsome African spearmen and Iberian warriors.

He lead them ever off to the left wing of the army.

... and what of the outnumbered Numidian cavalry screen ?
brave but overwhelmed, they bought a heavy price
 for the ground but they retired and fled the field.


Which left the troops of Gaius Nero the open flank !

Unopposed, the legions flanked the lines of Hasdrubal's infantry.


A great show, we really enjoyed meeting lots of show friends !

Thank you to the organisers again and a big shout out to
 those ladies who kept the hoards fed with delicious pies, sandwiches and cakes.

This game is the first of our trilogy of Punic War games. 
Catch us at Battleground Show at Middlesbrough 29th November then Carronade, Falkirk next May.

Monday, 7 July 2025

Romans and Carthaginians.

Last night the "fab four" (Paul,Graham,Brian and Myself) had this great game-Paul and Brian were the Carthaginian Generals,whilst Graham and I commanded(?) the Romans. 


The table layout-Romans to the left-already in three lines-two Legions!


Brian is furiously writing orders as his first line of Gauls and Elephants clash with Graham's Hastati!!

My legion takes a more sedate approach to Paul's waiting line of Spaniards and Elephants-the hill  proved to be a bit of a problem to me as Paul's use of his three units of Numidian cavalry was wonderful to watch(but not to be on the pointy end of!)


Both legions' Hastati are being torn apart by the combination of Elephants and wild Gauls! better send in the Princepes-a quick exchange of lines,and off we go!!


My hill is occupied by the enemy-oh dear!! meanwhile Brian's Spaniards,supported by some African spearmen,are making mince meat of Graham's Princepes! -oh dear again!!-looks good though.


My Princepes aren't doing so well against Paul's Spanish either!


Bloody Elephants!!!


My cavalry are retiring(it's good being retired!) leaving my Legion's flank totally exposed-all is lost!


Paul surveys the battle field-it has come down to the Roman Triarii-ie a defeat!!-this was a good game,we tried a couple of new Elephant rules which worked well(meaning they didn't dominate and spoil the game,as in previous games!) well done to us all,looking forward to next Sunday!


Obituary/Memorial for Charlie.

A fitting memorial was held for Charlie Wesencraft on June 28th-well attended by Wargaming friends,family and residents as well as anyone who attended his art and history classes-a very eloquent history of Charlie's life was given by his son,John,-a very memorable event-I will remember it for a long time.A fitting obituary was placed in this month's Wargames Illustrated by Robbie Roddis-thanks mate!


A big thanks to all who atteneded!

Friday, 13 June 2025

Charlie Wesencraft-memorial,

A fitting memorial for Charlie will be held at his old place of residence,on 28th June at 3.00 pm,the address is Linskill Park,Linskill terrace,North Shields,NE30 2BF-I hope to see a good turnout,to say farewell to this Wargames Legend .

Tuesday, 10 June 2025

AWI Battle Report

Entertaining evening in Steve Shann’s basement using his own rules which are progressing nicely.


We each have three “brigades”. I’m defending with the Americans. I have:
1st brigade: a good quality, large light infantry battalion with 2 standard battalions and some riflemen
2nd brigade: a good quality Continental battalion backed up by 2 standard battalions and a light gun
3rd brigade: 2 groups of quality Morgan’s Rifles
The 1st and 3rd brigade are on table, right and left flank respectively, with the 2nd just arriving. As American forces go, this is a darn good army!

Steve is attacking with his 3 brigades:
1st brigade: 2 standard Loyalist battalions with some British “Light Bobs”, who are the best quality, and some militia skirmishers, who are the worst quality!
2nd brigade: a very large battalion of British regulars who are good quality and a highest quality battalion of Scots
3rd brigade: Hessians! 2 standard quality musketeer battalions, a good quality grenadier battalion, some good jägers and a field gun
The Hessians are almost finished deploying on the British left whilst the Loyalists start just crossing the ford and the British regulars are behind them down the road.

The first photo above shows the majority of the table. You can see the head of the British column crossing the ford and the head of my 2nd brigade column bottom centre. Just at the left are half of the Morgan’s Rifles with the rest off screen to the left skulking in the woods, and off screen top right are the Hessians.

The aerial shots are a bit of an experiment. I needed to get higher really, but short-arsed and all that…

End of first turn. I’ve hopefully surprised Steve by advancing with my 1st brigade, taking the fight to the Hessians. My 2nd brigade and Steve’s 3rd have advanced to meet one another. Out of shot to the left his Light Bobs and militia are exchanging pleasantries with Morgan's Rifles.

Morgan’s Rifles are causing great consternation! The Loyalist militia skirmishers have been forced to retire (yes, yes, I’m sure it is good to be retired). The green coated Loyalist Rangers are quickly reduced in numbers due to enemy rifle fire!

Note though that the very large battalion of British regulars has already lined out alongside the Rangers.

 The Scots are making slow progress!


There’s a fair smattering of musketry between the Hessians and my 1st brigade.

The Light Bobs have lost a base from rifle fire (and the Loyalist militia skirmishers fled without having fired a shot). Steve looks to bring matters to a swift conclusion and charges the group of rebel riflemen causing them grief. The Loyalist battalion is breathing down everyone’s necks, but not involved in the melee.

The Light Bobs lose! It does leave the victorious American riflemen in an uncomfortable position…

End of turn 2. All of the British brigades have advanced and most of the units are fighting. The American 2nd brigade continues to advance and take up positions. I’m perhaps a little ambitious expecting this brigade to face two thirds of the enemy AND make sure the light battalion’s flank isn’t so exposed!

I put the 2nd brigade in harm’s way! I’ve pushed the best battalion forward…

It’s going quite well against the Hessians, but they’ve deployed their pesky field gun. Steve doesn’t have the best dice with it fortunately.

Although Morgan’s Rifles performed magnificently, this group weren't above failing to reload their rifles four times…!

The British regulars bayonet charge my Continental battalion, destroying them!


My light piece has some great dice shooting up the Scottish battalion slowly wending its merry way across the battlefield. I’ve sent the 1st brigade skirmishers to also intercept the Scots!


I’m sort of in position with the 2nd brigade. I’ve retired one group of Morgan’s Rifles and the second group is about to be forced to evade some charging Loyalists!


So the bird’s eye view at the end of turn 3. The British 2nd brigade is in danger of winning this battle! The large battalion has charged and destroyed a full battalion. The top quality Scottish battalion is aimed right at the flank of my light infantry battalion!


I push forward another battalion from my 2nd battalion. And those rude British bayonet charge them to oblivion as well! They’re at least severely depleted now.


That leaves the surviving battalion of the 2nd brigade with a lot to do. That’s some of Morgan’s Rifles catching their breath after scarpering to their rear.


I’ve charged away the Hessian gunners before they could do much damage to my precious light infantry battalion. I’m getting the better of these foreign mercenaries!


The Hessian grenadiers try a bit of this charging malarkey. Not quite as successful. My lads have been forced to retire, but the grenadiers are almost spent as a fighting unit.


The aerial view of most of the table at the end of turn 4. This shows the major movements, mostly charges. There is this one column though…


The Scots weathered more good artillery fire dice from me, marched to the flank of my light infantry battalion… and failed to deploy into line to charge home! It would have genuinely been the winning move of the game!


We’d run out of time (we had allowed chat, biscuits and a brew to eat away our gaming time!), but curiosity got the better of us. It all hung in the balance. How would the brigade activation cards come out if we’d played another turn? The red cards are British brigades and the blue cards are American brigades.

Inconsequential that the Hessians would activate first. Then all three of my brigades would have activated! That might have allowed me to punish the Scottish battalion some more and my light infantry battalion would fire and charge at the Hessians to their front before them there Scots did whatever nastiness they might do.

Nothing is certain.

Though my 2nd brigade was badly damaged, Steve’s forces had equally suffered. Still anyone’s game and too close to call 😁

I do love gaming AWI. What a privilege to play with such nice minis and terrain. My FIW collection is my AAWI collection! Almost American War of Independence!

Steve’s rules give a really enjoyable game. The morale tests are nervous moments. There’s that elation when the dice are right and your troops manoeuvre expertly or fire, reload and fire again to devastating effect. And there are those moments when you can’t roll above a 2 and it all goes Pete Tong. Great stuff! 

Cheers for reading!

Chris
WWG in Exile